Method 1: Single Executable (The Way That Actually Works)
Single executables are great until they're not. Here's what I learned after the third time my deployment failed at 3am.
What You Actually Need
Step 1: Build Something That Actually Works
Test your permissions locally first, or you'll spend hours debugging why your compiled binary can't read files. Also test that your binary actually starts up - I've had builds complete successfully but the executable immediately segfaults because of some weird import path issue that only shows up in production.
// main.ts - messy but works
import { serve } from "https://deno.land/std@0.208.0/http/server.ts";

const PORT = parseInt(Deno.env.get("PORT") ?? "8000");

const handler = async (req: Request): Promise<Response> => {
  const url = new URL(req.url);

  if (url.pathname === "/health") {
    return new Response("OK", { status: 200 });
  }

  if (url.pathname === "/api/data") {
    try {
      // TODO: clean this up later
      return Response.json({ message: "Hello from Deno 2!" });
    } catch (error) {
      console.error("API error:", error); // this saved my ass when debugging at 3am
      return new Response("Internal Server Error", { status: 500 });
    }
  }

  return new Response("Not Found", { status: 404 });
};

console.log(`Server starting on port ${PORT}`);
try {
  await serve(handler, { port: PORT });
} catch (error) {
  console.error("Server failed to start:", error);
  Deno.exit(1);
}
Your deno.json needs permissions that actually work in production:
{
  "compilerOptions": {
    "strict": true,
    "lib": ["deno.window"]
  },
  "tasks": {
    "start": "deno run --allow-net --allow-env main.ts",
    "build": "deno compile --allow-net --allow-env --allow-read=/etc/ssl,/opt/app/config --allow-write=/var/log/myapp --output=./dist/myapp main.ts"
  },
  "imports": {
    "std/": "https://deno.land/std@0.208.0/"
  }
}
Pro tip: The `--allow-read=/etc/ssl` part will save you 2 hours of debugging SSL certificate errors. The `--allow-write=/var/log/myapp` lets you actually write logs. You're welcome.
Step 3: Build and Test (This Will Fail The First Time)
## Build the executable
deno task build

## Test it locally - this catches 90% of issues
PORT=8080 ./dist/myapp
If the build fails, you probably have dynamic imports or missing permissions. The most common error is Cannot resolve module which usually means a dynamic import somewhere that compile can't see at build time.
Reality check: The binary will be bigger than they claim - mine are usually 60-80MB instead of the optimistic numbers in the docs.
Step 4: Copy Shit to the Server (And Deal With Permissions)
## Create the directory first or scp will fail
ssh user@yourserver.com "sudo mkdir -p /opt/myapp && sudo chown $USER:$USER /opt/myapp"

## Copy binary to server
scp ./dist/myapp user@yourserver.com:/opt/myapp/

## SSH and fix permissions (this always breaks)
ssh user@yourserver.com
chmod +x /opt/myapp/myapp

## Test it works before setting up systemd
cd /opt/myapp && PORT=8080 ./myapp
When this fails: Usually it's missing /tmp access or the binary can't bind to the port. Check `journalctl -f` while testing.
Step 5: systemd Service (Prepare for Pain)

OK, enough complaining about systemd. Here's how to actually configure it.
Create /etc/systemd/system/myapp.service - and yes, you need to create a user first:
## Create the service user (systemd will fail without this)
sudo useradd -r -s /bin/false myapp
sudo mkdir -p /var/log/myapp
sudo chown myapp:myapp /var/log/myapp
[Unit]
Description=My Deno 2 Application
After=network-online.target
Wants=network-online.target

[Service]
Type=simple
User=myapp
Group=myapp
WorkingDirectory=/opt/myapp
ExecStart=/opt/myapp/myapp
Restart=always
RestartSec=10
Environment=PORT=8000
StandardOutput=journal
StandardError=journal
SyslogIdentifier=myapp
TimeoutStopSec=5

## This prevents most common systemd failures
PrivateTmp=true
NoNewPrivileges=true
ProtectSystem=strict
ProtectHome=true
ReadWritePaths=/var/log/myapp

[Install]
WantedBy=multi-user.target
Enable and start (then debug for 30 minutes):
sudo systemctl daemon-reload
sudo systemctl enable myapp
sudo systemctl start myapp

## Check status (will probably be failed)
sudo systemctl status myapp

## When it fails, check logs
sudo journalctl -u myapp -f
When systemd fails: It's usually permissions or the binary path. Status code 203 means exec failed - usually wrong path or missing execute permissions. Status code 1 means your binary crashed immediately - probably missing files or wrong permissions.
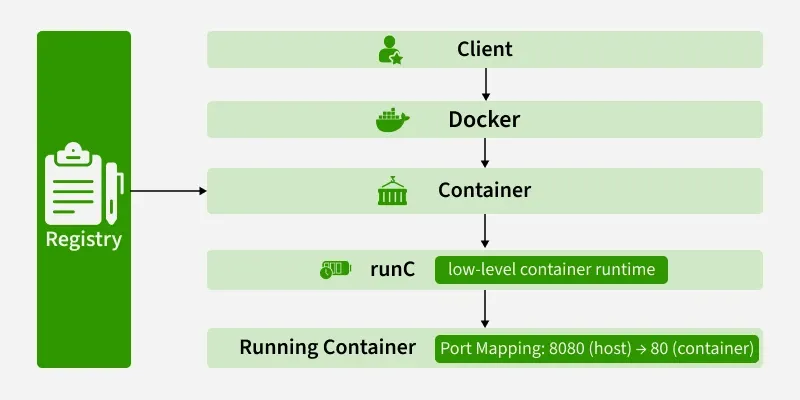
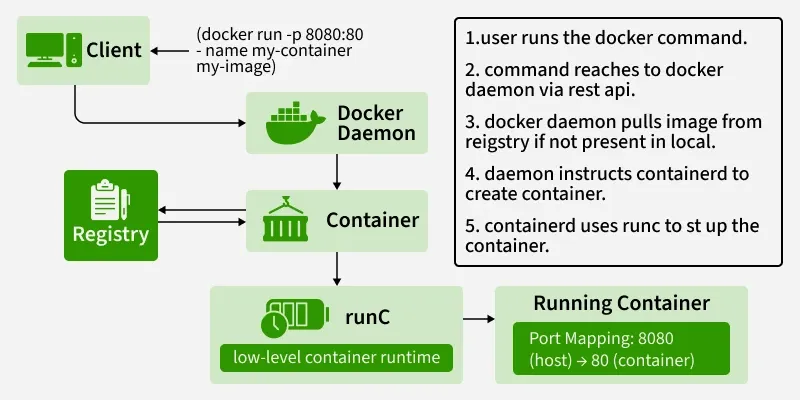
Method 2: Docker Container Deployment
Docker provides consistent environments and easier scaling options. On my 2019 MacBook this takes forever but on actual servers it's not too bad.

Step 1: Create Multi-Stage Dockerfile
## Build stage
FROM denoland/deno:2.0.6 AS builder

WORKDIR /app
COPY . .

## Cache dependencies
RUN deno cache main.ts

## Compile to single executable
RUN deno compile --allow-net --allow-env --allow-read=/etc/ssl --output=./myapp main.ts

## Production stage - use distroless for security
FROM gcr.io/distroless/cc-debian12

WORKDIR /app

## Copy only the compiled binary
COPY --from=builder /app/myapp /app/myapp

## Non-root user for security
USER 1001

EXPOSE 8000

CMD ["/app/myapp"]
Step 2: Build and Optimize Image
## Build the image
docker build -t myapp:latest .

## Check image size (should be ~60-80MB)
docker images myapp

## Test locally
docker run -p 8000:8000 -e PORT=8000 myapp:latest
Step 3: Production Docker Deployment
Create docker-compose.prod.yml:
version: '3.8'

services:
  myapp:
    image: myapp:latest
    ports:
      - "8000:8000"
    environment:
      - NODE_ENV=production
      - PORT=8000
    restart: unless-stopped
    healthcheck:
      test: ["CMD", "/app/myapp", "--version"]
      interval: 30s
      timeout: 10s
      retries: 3
      start_period: 40s
    deploy:
      resources:
        limits:
          memory: 512M
        reservations:
          memory: 256M
    logging:
      driver: "json-file"
      options:
        max-size: "10m"
        max-file: "3"

  reverse-proxy:
    image: nginx:alpine
    ports:
      - "80:80"
      - "443:443"
    volumes:
      - ./nginx.conf:/etc/nginx/nginx.conf:ro
      - ./ssl:/etc/ssl/certs:ro
    depends_on:
      - myapp
    restart: unless-stopped
Perfect for applications with variable traffic or microservices architecture. The Deno Deploy docs have everything you need.
## Install deployctl
deno install -A --unstable-kv jsr:@deno/deployctl

## Deploy directly from Git repository
deployctl deploy --project=myapp --prod

## Or deploy local files
deployctl deploy --project=myapp --prod main.ts
Cloudflare Workers (using Deno-to-Worker compatibility):
// worker-adapter.ts
export default {
  async fetch(request: Request): Promise<Response> {
    // Your existing Deno application logic
    return new Response("Hello from Cloudflare Worker!");
  }
};
Railway Deployment:
## railway.json
{
  "build": {
    "builder": "DOCKERFILE"
  },
  "deploy": {
    "healthcheckPath": "/health",
    "healthcheckTimeout": 100,
    "restartPolicyType": "ON_FAILURE"
  }
}
Production Environment Configuration
Environment Variables
Create `.env.production`:
NODE_ENV=production
PORT=8000
DATABASE_URL=postgresql://user:pass@host:5432/db
ALLOWED_ORIGINS=https://yourapp.com,https://api.yourapp.com
LOG_LEVEL=info
MAX_REQUEST_SIZE=10mb
RATE_LIMIT_WINDOW=900000
RATE_LIMIT_MAX=100
Load in your application:
import { load } from "https://deno.land/std@0.208.0/dotenv/mod.ts";

const env = await load({
  envPath: "./.env.production",
  export: true,
});
SSL/TLS Configuration
For self-hosted deployments, configure HTTPS:
// https-server.ts
const cert = await Deno.readTextFile("/etc/ssl/certs/cert.pem");
const key = await Deno.readTextFile("/etc/ssl/private/key.pem");

await serve(handler, {
  port: 443,
  cert,
  key,
});
Or use a reverse proxy like Nginx:
## /etc/nginx/sites-available/myapp
server {
    listen 443 ssl http2;
    server_name yourapp.com;

    ssl_certificate /path/to/cert.pem;
    ssl_certificate_key /path/to/key.pem;

    location / {
        proxy_pass http://127.0.0.1:8000;
        proxy_http_version 1.1;
        proxy_set_header Upgrade $http_upgrade;
        proxy_set_header Connection 'upgrade';
        proxy_set_header Host $host;
        proxy_set_header X-Real-IP $remote_addr;
        proxy_set_header X-Forwarded-For $proxy_add_x_forwarded_for;
        proxy_set_header X-Forwarded-Proto $scheme;
        proxy_cache_bypass $http_upgrade;
    }
}
Monitoring and Health Checks

Add comprehensive monitoring:
// monitoring.ts
export async function healthCheck(): Promise<boolean> {
  try {
    // Check database connectivity
    await fetch("your-database-health-endpoint");

    // Check external APIs
    await fetch("https://api.critical-service.com/health");

    return true;
  } catch {
    return false;
  }
}

// Add to your main server
const handler = async (req: Request): Promise<Response> => {
  if (req.url.endsWith("/health")) {
    const isHealthy = await healthCheck();
    return new Response(isHealthy ? "OK" : "UNHEALTHY", {
      status: isHealthy ? 200 : 503,
    });
  }

  // Your app logic here
};
Look, after trying all these approaches in production, here's the real talk:
The choice isn't permanent. Start simple, then evolve your deployment strategy as your app grows. Don't over-engineer from day one - you'll just spend more time debugging deployment configs instead of building features.